Sunday, July 7, 2013

Little Man Mustache Cake

It's birthday time again, and one of my friends asked if I could make a cake for her son's 1st birthday. She already decided on the theme of "Little Man, Mustache's and Top Hat's." So I of course went to Pinterest for inspiration. I found it from a pin that linked back to Sugar Shindigs.
Inspiration cake from Sugar Shindigs.

I learned from my other fondant creations that making your own is challenging, and time consuming. So this time I researched other ways of making sugar based icing that would be used for decorations like those on my inspiration cake. 

I found what I needed on Pinterest. It's a SUPER easy recipe for sculptable frosting that can be cut and shaped like fondant. The best part: it has a great flavor and smooth texture. It was from The Decorated Cookie and worked magically. 

Easy to mix, easy to color and tasted delicious!

My friend requested the same strawberry cake that I had made for her once before. My favorite strawberry cake recipe from Paula Deen.

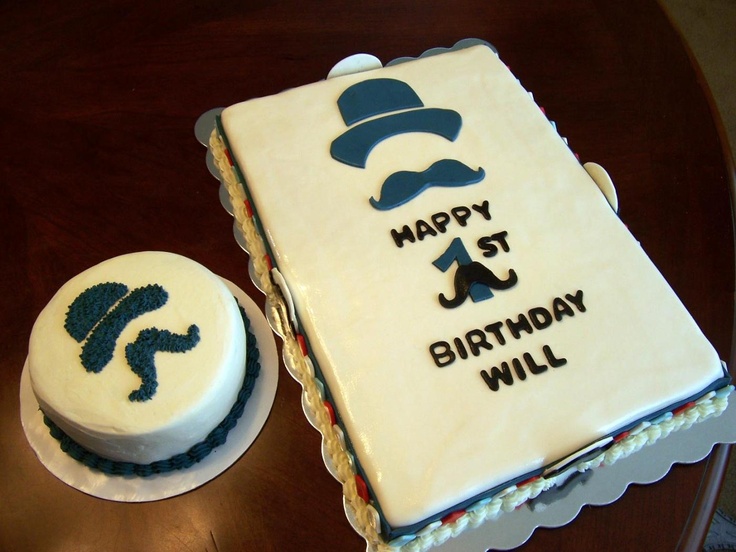
I used strawberry flavored white buttercream icing to fill and cover the cake. I then mixed sculptable icing in black, red and teal to go with the party's color theme. I rolled out the icing and used a piece of paper to trace out the top hat and mustache. I hand rolled the little decorations that I used around the edges and hand formed the words "Happy Birthday MJ." 
Little Man Mustache & Top Hat cake for MJ.

The decorating was easy, the cake stayed moist and it was a huge hit at the party! 

It was  a lot of fun.

Thank You Pinterest, Sugar Shindigs and Paula Deen!

~ Jessica

Friday, July 5, 2013

Banana Pudding Poke Cake

Banana Pudding Poke Cake Deliciousness.
If you've seen my Pinterest Boards, then you know I have a few boards devoted solely to FOOD. This yummy post can be found on the board: Cakes, Cupcakes & Cookies Oh My!

It's from the The Country Cook and on her blog she also has directions for Oreo Puddin' Poke Cake, Boston Cream Poke Cake, Coconut Cream Poke Cake & Jell-O Poke Cake. If you haven't heard of this before, then you're probably asking yourself "What in the world is poke cake?" That's the same question everyone asked when I showed up with this cake at the 4th of July cookout yesterday.

In a word: DELICIOUSNESS.

I love this cake more than I love that word (and I love that word, I use it all the time). I LOVE IT. 

I was introduced to poke cake at work by a fellow Pinterest addict that made one for an office birthday celebrations. I've been addicted ever since.

This is one of those cakes you can't mess up. You bake a yellow cake, and after it cools you poke holes in it - hence the name "Poke Cake." Mix up some banana pudding, pour it over the cake, add a layer of fresh cut bananas, top it with whipped cream and smashed vanilla wafers and... voila!

It is THE BEST banana pudding cake I have ever eaten. I'm not a big fan of banana pudding, so I never would have thought to try on my own. I love a moist yellow cake, and when you add pudding the result is the most moist delicious cake you'll ever eat. Add that to the crunch of the cookies and you're in banana pudding heaven!

I have since mixed it up a bit. I made one with strawberry cake, cheesecake pudding, fresh strawberries, whipped cream and graham crackers. Unfortunately, (it was apparently so delicious) I didn't even get a picture before it was gone.

I can't wait to try some of the other varieties, but after making this three weeks in a row we're on a no cake fast so I'll have to wait...

Thank you Pinterest & The Country Cook!

~ Jessica

Sunday, June 16, 2013

Chick-fil-A Nuggets

The result = YUM.
Who doesn't love Chick-fil-A chicken nuggets? Go ahead. Ask around. I'll wait.

Needless to say, when I pinned this copycat recipe from Mandy's Recipe Box I couldn't wait to try to it. My 4-year old's favorite fast food meal is Chick-fil-A chicken nuggets and french fries, so when he found out what was for dinner I knew he'd be the toughest critic.

In this copycat attempt I used the exact ingredients, no substitutions. I didn't make the sauce because my little one prefers ketchup, and I was missing a few ingredients. 

I did vary the preparation slightly. I was a little short on time, so my chicken didn't get to sit as long as perhaps it should have (it marinated for about 1 1/2 hours). It was easy enough to mix the ingredients, and I used canola oil (Peanut oil is suggested). I haven't fried food in years because we're just not a big fried food family, so I dropped one nugget in at a time to test the oil. It took a few botched nuggets before I got the oil hot enough.

Overall the nuggets were very good and flavorful. Comparable to Chick-Fil-A, but not as close as I expected. Perhaps if I let the chicken marinate a little longer, the nuggets would have been more tender. 

We couldn't have Chick-fil-A nuggets without waffle fries, so I baked some. My little one was happy with the end result, and so this is certainly one I'll try again.

Thank you Pinterest & Mandy's Recipe Box!

~ Jessica

Sunday, June 9, 2013

Meatless Monday

Gooey Tomato and Cheese Deliciousness.
In an effort to be healthy and get more fruits and vegetables into my families diet, I am testing out this "Meatless Monday" idea. So where do I turn to find good meatless meal ideas? 

Pinterest of course!

(On second thought, I may have initiated Meatless Monday after finding this pin, I don't know...)

Anyway, I found this Rustic Tomato Tart through a Pin to the Lick The Bowl Good blog.

It consists of a homemade crust, Roma tomatoes, Dijon mustard, mozzarella cheese and seasonings. Again, I made do with what was in my kitchen, so I used Dijon Honey Mustard, and for the seasoning I used McCormick Perfect Pinch and garlic salt instead of minced garlic and the others mentioned.

As it baked, it smelled amazing! 

I'm not a fan of mustard really, but you can't even taste the mustard. The tomatoes took on a marinara flavor after being baked, and the crust was crispy and flaky and it oozed with gooey bubbling cheese deliciousness. 

It was easy to cut with a pizza cutter, and kinda reminded me of a stuffed pizza like those you can find in the mall. We had salad with it and let me say, not one person missed the absent meat. It was hearty and delicious. I can't wait to try it again!

Thank you Pinterest & Lick the Bowl Good, it certainly was bowl (cookie sheet actually) licking good.

~ Jessica

Sunday, June 2, 2013

Baked Pancake Deliciousness

The end result. It was so good!
Yes, deliciousness is a real word. For a second I thought I might have just made that up, but I didn't.

Anyway. This is about food and my LOVE for pancakes. 

I remember being about eight or nine and watching attentively as my Uncle instructed me on the "science" of making pancakes.

Make sure the pan is hot. 
Wait for the bubbles in the batter. Check the edges carefully.

 But what I remember most is him emphasizing "patience." You must have patience. If you turn them too soon you'll mess 'em up. 

So imagine my excitement, after 20 years and umpteen burned pancakes, when I pinned a recipe for "Baked Pancakes." I was skeptical at first, but after a long day of working and an afternoon of pinning (it relaxes me), I decided to test out this Pinterest find as a quick breakfast for dinner meal. Breakfast for dinner is always a hit at our house.

The recipe is from Big Red Kitchen.

It consists of milk, butter, egg, sugar, flour, baking powder and salt. Basically, you mix up the ingredients to make the batter, pour it in a pan and bake. You don't have to stand over the stove flipping hotcake after hotcake. It only takes 20 minutes to make everyone pancakes, and everything gets done at the same time so everything is hot and delicious when you're ready to sit and eat. No cold bacon while you're waiting to finish up the pancakes!


I did have to do a few substitutions (like I said, it was a long day) based on what I had in my kitchen at the time. As far as I can tell, it didn't change the deliciousness of the recipe. I used Vanilla Soy Milk, added a little bit of vanilla extract and used a round cake pan. I topped it with blueberries and strawberries, and we them it with a side of bacon.

It is officially my favorite breakfast for dinner!


Breakfast for dinner deliciousness!


I haven't made regular pancakes since I found this. I have made it for a few house guests, and although they're skeptical at first, not one person has rejected a second helping.

Thank you Pinterest & Big Red Kitchen!

~ Jessica

Sunday, May 5, 2013

Captain America Party: The Party

The Stars & Stripes Bounce House.
Perfect. 

That's the only word I would use to describe the party.

From the invitations, to the entertainment I had a great time pulling it all together and we had so much fun celebrating his 4th birthday. This year we received the correct bounce house (and it worked), and we had just enough people show up. We had a mix up the year before with the rental, but Blue Baboons pulled through and helped it to be great event this time around.

The kids bounced around the yard for the first hour or so, and then we shuffled everyone into the garage for a few more "party games" and food (grilled hotdogs, chips and cake).


Avenger's Coloring Masks & Avenger's Crayons.
While the kids were waiting, I had parents help with Avenger's temporary tattoos I picked up from Michael's. Each kid was also able to color their choice of Avenger mask: Captain America, Iron Man, Thor and The Hulk. I even found Avenger's crayons at the Dollar Tree.


One of the many Captain America masked guests.

Everyone cut out their masks (some needed help) and then we used pipe cleaners to fasten them to their heads. This was the perfect distraction while we fixed plates and brought the food out to the garage.

Overall it was a lot of fun, and unlike year's past I was able to enjoy the festivities. I had everything staged and ready which made it a breeze when I needed help transitioning from the yard to the garage. I even had a chance to jump in the bounce house. 

##LESSON###

Party planning is exhausting, kids never run out of energy, and it's awesome when all you have to do is clean up the garage floor after a party. Next year I think we'll opt for something small, like a family trip to Disney or something...

~ Jessica


Wednesday, May 1, 2013

Captain America Party: The Cake

This time around I wasn't very adventurous with the cake decorating. I found some sugar sheets that could literally be cut into any shape you want, so I opted for the simple round cake with the Captain America "sugar shield" cut out on top. I also made cupcakes since the party guests totaled 20+.
The "Shield" cake.

I "doctored up" a Funfetti box cake to make it taste more homemade (here's the recipe for that) and I made homemade icing (here's that recipe, I always use this one). I decorated the sides of the cake and the tops of the cupcakes with Wilton red, white and blue stars sugar decorations. 

I cut out the sugar sheet shield the night before and wrapped it in wax paper until I iced the cake the next day.

##LESSON##

Sugar sheets are very sensitive to heat. The star was the top layer and melted a little over night. I had to re-cut and piece together a small portion of it because it stuck to the wax paper. Probably should have put it in the fridge or pieced it together the same day.


I found the cupcake liners during a random trip to Michael's. They were technically for a circus themed party, but because I didn't use the circus tent toppers they fit the theme perfectly.

Captain America cupcakes.


I made a total of 48 cupcakes and one double layer round cake. My son loved it and everyone thought the cupcakes tasted as homemade.


Mission Accomplished. It was a success.

 ~ Jessica


Sunday, April 28, 2013

Captain America Party: The Decor

It was pretty easy coming up with decor to fit the theme: Red, White & Blue.

It's close enough to the 4th of July that this stuff started to appear in stores and I took FULL advantage. My first stop was my new favorite store: Dollar Tree (Everything's $1).

I picked up some craft paper along with some red and blue wrapping paper to cover the folding tables where the kids would be sitting.

The best part -- each roll was $1 and I had more than enough to cover all the tables. I discovered this trick with craft paper during a work event. I never knew that craft paper (and wrapping paper) fit the width of a folding table perfectly, and after you cut it to the length **TA-DA** instant table covers. 

The best part --> the kids can color on them and clean up is super easy, roll it up and throw it away. I taped them down so they don't move around. Another good advantage to using paper like this is avoiding spills that result from shifting plastic tablecloths and rowdy toddlers.

The tables decorated and ready in the garage.


I picked up some table decorations (in red, silver & blue of course) that doubled as balloon weights. I used three flag themed star balloons, and a total of 9 star shaped Mylar balloons in red, white and blue to create the center pieces for the tables. They were $1 each at Dollar Tree. 

Lastly, I used red, white and blue streamers to make the garage feel like a party room. It was the perfect space, and for $22 I think it looked pretty nice. 

The garage not only looked pretty festive, but it was perfect protection from the ran that started right at cake time.

~ Jessica


Balloon center pieces.


Treat table with favor bags and candy.

Sunday, April 21, 2013

Captain America Party: The Favors

The idea for this party came from my son basically refusing to take off his Captain America costume from Halloween last year. He would still be trying to wear it if I hadn't swiped it from his closet and stuffed it in a cabinet in the laundry room.

Knowing how much he loved it, I figured why not give it one last hurrah! His birthday is in April, so I figured (theoretically) he should still be able to fit it one last time.

After deciding on the theme, I pretty much started purchasing anything that fit the theme and could work for the "backyard, bounce house, superhero costume party" that I had in mind. 

The first thing that I put together were the party favors for the guests.


#LESSON#

Start planning as early as possible. If you know the theme you'll be able to score awesome stuff. Plus, it paces the spending, it's like a birthday party on layaway.

On a random shopping trip I found Captain America sticker books at Target. There were eight books in each pack, with about five sheets per book and the entire pack was $1. I could fill 20+ bags with a few full sheet of stickers.

Next, I found Captain America Pez dispensers at Walmart (they were $1.50 each). I knew they'd work for the boys, so I purchased those in January which was smart, because they were gone by April. It wasn't until around that time that I decided on Disney Princess Pez dispensers for the girls. I ended up with Bell, Mulan, Princess Tiana and Sleeping Beauty.

Once I had the biggest pieces figured out I needed to find something to hold all of the treats. I'm addicted to Pinterest, and that's where I found the inspiration for the treat bags. I already had some blue paper lunch bags, so when I saw these Captain America bags "Pinned" for $13, I was determined recreate them. I used stuff I already had, so it didn't cost me anything to make the boys bags.

 
Inspiration bag from Pinterest.


Blue bags and construction paper used for the Captain America bags.

For the girls, my "Love" thought of the wonderful idea to do Wonder Woman treat bags so they would fit the "Super Hero" theme. I purchased red paper lunch bags from Target (40 for $1.80) and used a combination of construction paper, printed Wonder Woman logos and silver star stickers (from Target, they also have them at the Dollar Tree I later discovered). So those bags cost me about $.07 each (I obviously have lots of leftover bags, which are good for dividing popcorn between little ones at the movies).

Wonder Woman logo, construction paper, stars and red bags used for Wonder Woman bags.


I lucked up and also found Avengers candy at the Dollar Tree (three different kinds) which I used to fill the rest of the bag (Taffy at nine for $1, Rock Candy at three for $1 and Sour Straws at eight for $1). 

All in all each bag cost roughly $2.15 to create and fill. I made a total of 10 Wonder Woman bags and 10 Captain America bags.


#LESSON# 
Try to use things that you already have, and make sure that you shop at the Dollar Tree. Everything's $1.

This was the first thing that I put together completely for the party and I was so excited to see the idea come together. I finished them a week before the party! 


~ Jessica


Captain America & Wonder Woman Treat Bags before they were stuffed.


The bags after they're filled with goodies. I hole punched the corners, attached a piece of construction paper with some ribbon (and a star sticker) and wrote "Thank You" on each one.


Sunday, April 7, 2013

Captain America Party: The Invitations

Thanks to Pinterest,  I decided to print my own invitations for the party. I wanted to tie in the "Captain America" theme, and I wanted to do something that would be a keepsake as well. I saw these personalized invitations on Pinterest (from Etsy) and of course, my first thought was -- I can do that! 

So... I did.


The inspiration for the invite from Pinterest.

I had some office supplies left over from another project so I setup a word document using the Avery postcard paper template and set out to recreate the design. I will say however, unless you are really familiar with Microsoft Word, you may not want to try this, you can always just buy the invitations on Etsy. It was simple for me, but could be pretty time consuming for a beginner. I used a free font,  Lafayette Comic, a picture of my son in costume and some small envelopes customized with Captain America stickers that I printed, on a page of labels. 
The finished invites.

It turned out pretty awesome and didn't cost me anything, and so far everyone that has gotten one has been pretty impressed.

~ Jessica